Asynchronous Programming is hard. Especially without the right tools. In one of my previous posts, I talked about how to make asynchronous programming more bearable using RxJS. Today we’re going to look at another implementation of the ReactiveX Api, RxSwift.

I’m not going to go into much detail on the basics of FRP, so if you don’t know what Reactive Programming is all about, I suggest you check out my previous posts or this great article about the fundamentals of RxSwift.

In its most basic way Functional Reactive Programming is about using event streams as your data and composing them via functions. In FRP, everything is a stream of events. We can then observe these streams and react accordingly. Swift already has a feature called Property Observers which go in a similar direction, but are much less powerful than RxSwift.

The actual term “Functional Reactive Programming” was originally coined in the 90s and it’s disputed whether the ReactiveX Api’s really are formulations of FRP. But I personally like to think of FRP as a programming style streching across different formulations (Elm creator Evan Czaplicki made a great video about this).

RxCocoa

RxCocoa is to Cocoa what RxSwift is to Swift. RxSwift provides the fundamentals of Observables and RxCocoa provides extensions to the Cocoa and Cocoa Touch frameworks to take advantage of RxSwift.

Now without further ado, let’s start building our first iOS application utlizing our reactive approach. For that you’ll need to install RxSwift and RxCocoa, so add them to your Pod- or Cartfile, depending on which you use.

Once that’s done we can begin for real. We’re going to create an application where we can save and review different movies on a scale from 0.0 to 10.0.

For starters, we’ll create a TableView and a corresponding TableViewCell in our Interface Builder. In our cell, we’d like to display the Title and the score, so we’ll add to UILabels to it. Then let’s also add an “Add” Button in our Navigation Bar, to dynamically add new Movies to our Table.

So far so good, next we’ll start writing some code for our model and our Cell. Our model is very simple right now and should only contain data for our title and our rating. Here’s how it should look:

class Movie {
    let title: Variable<String>
    let rating: Variable<Float>
    
    init(){
        title  = Variable("")
        rating = Variable(Float(5.0))
    }
    
    init(title: Variable<String>, rating: Variable<Float>){
        self.title = title
        self.rating = rating
    }
}

Notice, we define our title and rating as type Variable. If you know other flavors of Rx you can think of them as BehaviourSubjects. Basically it emits the most recent item it has observed immediatly to each subscriber. This allows us to push data to a Variable, but also allow subscribing to it, this will be useful later on.

Next up is our movie table cell:

class MovieTableViewCell: UITableViewCell {

    @IBOutlet weak var ratingLabel: UILabel!
    @IBOutlet weak var titleLabel: UILabel!
  
    var movie: Movie?
}

Really nothing special going on here at all. We’ve connected our two Labels to our Class via the @IBOutlet Annotation.

Now it’s time for the real meat of the application, our TableView. Because it’s quite a lot to handle, I’ve segmented the code into several smaller pieces:

class MovieTableController: UIViewController {

    @IBOutlet weak var movieTable: UITableView!
    
    @IBOutlet weak var addButton: UIBarButtonItem!
    
    let disposeBag = DisposeBag()
    
    let initialMovies: [Movie] = [
        Movie(title: Variable("Die Hard"), rating: Variable(Float(10.0))),
        Movie(title: Variable("Twilight"), rating: Variable(Float(1.0)))
    ]
    
    func initState(addButton: UIBarButtonItem) -> Observable<[Movie]> {
        
        let add = addButton.rx_tap
            .map{_ in  Movie()}
            .scan(initialMovies, accumulator: { (acc,cur) in
                var copy = acc
                copy.append(cur)
                return copy
            })
        
        return add.startWith(initialMovies)
    }
    
    func setupCell(row: Int, element: Movie, cell: MovieTableViewCell){
        cell.movie = element
        
        element.title.asObservable()
            .bindTo(cell.titleLabel.rx_text)
            .addDisposableTo(self.disposeBag)
        
        element.rating.asObservable()
            .map{String($0)}
            .bindTo(cell.ratingLabel.rx_text)
            .addDisposableTo(self.disposeBag)
    }


Now this certainly looks like a lot, but it’s actually kind of simple. At first we set up our DisposeBag. This is needed, because the Swift runtime doesn’t have Garbage Collection, but relies on Automatic Reference Counting. To avoid memory leaks, we’ll have to put our Subscriptions into a DisposeBag.

In our initState function we retrieve a Stream of button pressed from our addButton, map each press, to create a new Movie, then use the scan operator to add the new movie to our array and finally tell it to start with our initial movies. Sadly Swift doesn’t support immutable appends, so we have to do it the verbose way of copying, appending and returning the copy.

In our setupCell method we configure our two labels, by binding our Observables to the rx_text field of the labels. In the case of the Rating we first have to transform our Float values to Strings.

Now for the next part:

   
    override func viewDidLoad() {
        super.viewDidLoad()
        
        let movies = initState(addButton)
        
        movies.bindTo(movieTable.rx_itemsWithCellIdentifier("movieCell", cellType: MovieTableViewCell.self)) (configureCell: setupCell)
            .addDisposableTo(disposeBag)
        
    }
    
}

In this snippet, we bind the Observable of Movie-Arrays to our TableView using the rx_itemsWithCellIdentifer method. This returns a partially applied function, where we can pass the setup code we defined earlier for each individual cell.

Now the basics of our app should run. However, we now always add an empty Movie which we can’t edit at all. That’s rather unfortunate so let’s change that by adding a detail view where we can edit and add new Movies.

For that let’s start by creating a ViewController in the Interface Builder with a TextField for our movie title, a Slider for our review score and a Label to display the score in text. Next we’ll define a segue from our TableController to our DetailController.

Then we’ll need to define when to actually perform the segue. In our TableView add the following code to the end of viewDidLoad:

movies.skip(1).subscribeNext { arr in
    self.performSegueWithIdentifier("editMovie", sender: self.movieTable.visibleCells.last)
}.addDisposableTo(disposeBag)

movieTable.rx_itemSelected.subscribeNext { index in
    self.performSegueWithIdentifier("editMovie", sender: self.movieTable.cellForRowAtIndexPath(index))
}.addDisposableTo(disposeBag)
        

And then also add this method:

override func prepareForSegue(segue: UIStoryboardSegue, sender: AnyObject?) {
    if let movieController = segue.destinationViewController as? MovieDetailController {
        if let movieCell = sender as? MovieTableViewCell{
            movieController.movie = movieCell.movie
        }
    }
}

When performing side effects such as switching views, we need to manually subscribe to our Observables using subscribeNext. We can do this everytime we add to our movies and when we select a specific movie using rx_itemSelected.

In our prepareForSegue method we pass the movie from our cell to our MovieDetailController, which we have yet to define so let’s start right now.

First we create a ViewController in the Interface Builder with a TextField for our movie title, a Slider for our review score and a Label to display the score in text.

Then we create a class for our new controller:

class MovieDetailController: UIViewController {

    @IBOutlet weak var titleField: UITextField!
    @IBOutlet weak var ratingSlider: UISlider!
    @IBOutlet weak var ratingLabel: UILabel!
    
    var movie: Movie?
    let disposeBag = DisposeBag()
    
    override func viewDidLoad() {
        super.viewDidLoad()
        
        //define our stuff here
    }
    
}

Pretty straightforward. Now let’s define the relationships of our components and our movie. I’m not going to post the full code here since it’s just more of the same and the article is already quite code heavy, but here’s an idea of what to expect:

let rating = ratingSlider.rx_value.map { round(10 * $0)/10}
        
rating
   .bindTo(movie!.rating)
   .addDisposableTo(disposeBag)
   
rating
   .map{String($0)}
   .bindTo(ratingLabel.rx_text)
   .addDisposableTo(disposeBag)

Now after getting up to this point, this shouldn’t look very alien to you anymore. We use the round function to truncate to 1 digit of precision and then bind it to our Movie model and our label’s rx_text.

If you’ve done everything right your app should now look something like this:
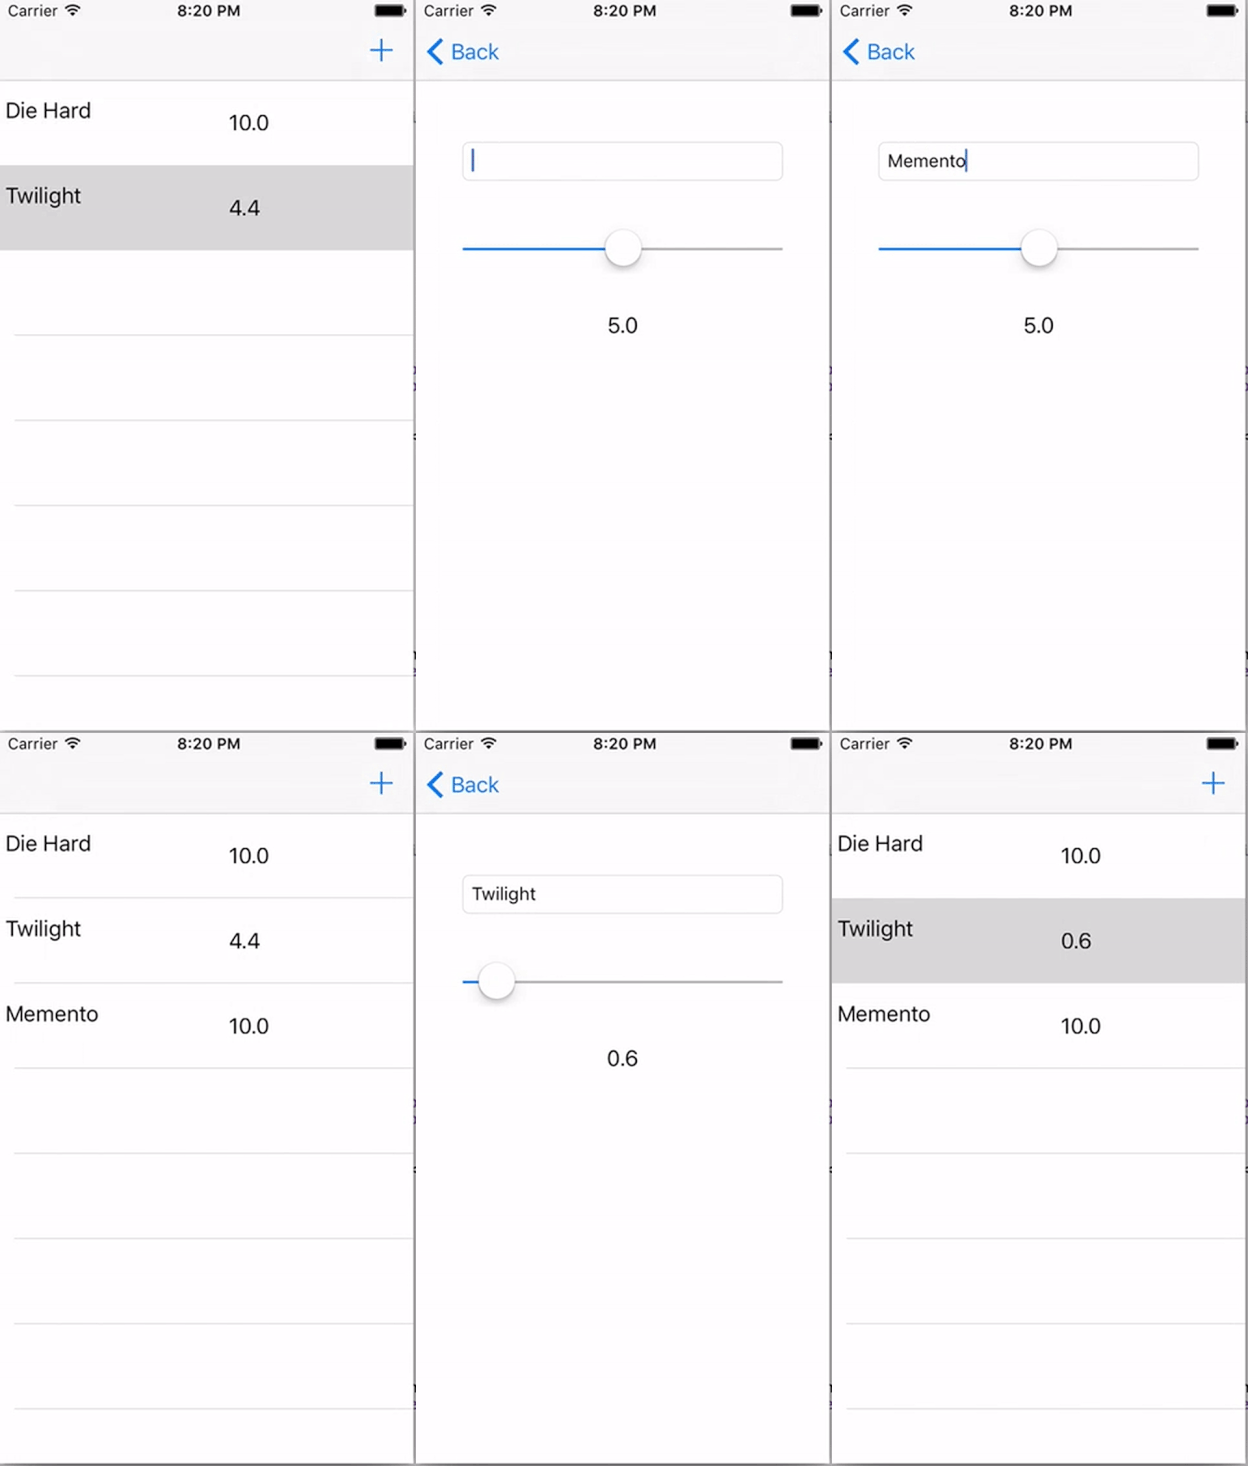
RxCocoaApp

And with that we’re done a fully reactive approach to iOS programming. I hope you enjoyed this piece and try it out sometime. If you’re intrigued at all I suggest checking out the RxSwift Repo for more information. You don’t need to commit to it fully, but I feel RxSwift also works really well for just a couple of your Views.

As usual, all code shown here, can also be found in this GitHub repo

In my last post, I tried to show how to do Functional Reactive Programming in Angular 2. Now I’ve heard from some people that it’s too complicated and you shouldn’t ever really do it. I definitely understand that, switching programming paradigms is probably the most difficult change you can make, as it requires you to forget almost everything you already learned.

While showing the benefits of another programming paradigm is quite difficult and always to some extent subjective, showing some real performance benefits is a lot more objective. The real problem with mutable data, is that it can be slow while performing change detection.

Change detection

This problem, of course isn’t exclusive to Angular, but can be applied to e.g. React as well. There are some great resources out there to fully understand how Angular 2’s change detection system really works, but I’ll give it a shot and try to recap the most important points here.

The first problem really is how do you know a change occured? When using mutable data, what you have to do is do a deep equality check, i.e. checking every single property of an object if it’s still the same. If our component tree is very large, this can be very very expensive, because change detection will trigger on every browser event. Starting to sound really ineffecient, right? I did a quick diagram in draw.io to visualize what I’m saying: Tree

When something changes (in red) all components have to be checked.

One solution to this problem would be to make our data immutable, preferably with some framework like Immutable.js. With immutable data, we no longer have to do deep equality checks. This is because the data can never be changed, so if we want to check for changes, we can just do a reference equality check. So now instead of checking every single leaf of our tree, we just need to check the paths where our components aren’t referentially equal. Here’s another diagram, to show you what’s changed: Tree with Immutable data

This time we only have to check those that aren’t referentially equal and don’t have to check their children (in grey).

Also, if you want even more insight check out this video from React Conf about Immutable.js.

Moving on to Observables we can get even better performance! This is because we can simply subscribe to our Observable to get notified when it emits an event immediatly. We no longer have to go through all components from the root, but only the path from the root to our changed component. This is how that looks: Tree with Observables

So what does this mean in real terms?

In Angular 2 for normal use, we can guarantee that the change detection is O(n) where n is the number of components in the tree (which is already much faster than Angular 1 thanks to the Unidirectional data flow). When using Observables, we get essentially O(log(n)) which is awesome!

Now of course this still isn’t “real” data, so I took it upon myself to create a little “benchmark”. I rewrote the app from the last article using ngModel and mutable data to see the differences. So our new template now looks like this:

<div>
    <h2>{{ form.name }}</h2>
    <form>
        <label>Name:</label>
        <input type="text" [(ngModel)]="form.name"><br/>
        
        <label>Height (cm):</label>
        <input type="number" [(ngModel)]="form.height"><br/>
        
        <label>Weight (kg):</label>
        <input type="number" [(ngModel)]="form.weight"><br/>
    </form>
    
    <div><strong> Body Mass Index (BMI) = {{ getBmi() }}</strong></div>
    <div><strong> Category: {{ getCategory() }}</strong></div>
</div>

I ran both versions with lots and lots of these components and profiled them with Chrome. These are the results:

Using ngModel

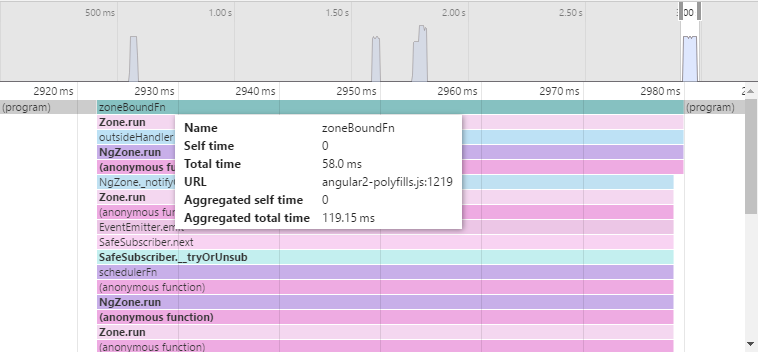
Here we’re using ngModel and we can see it takes about 58ms for one change detection cycle. The total aggregated time of change detection throughout the period of testing is 119.15 ms.

Using Observables

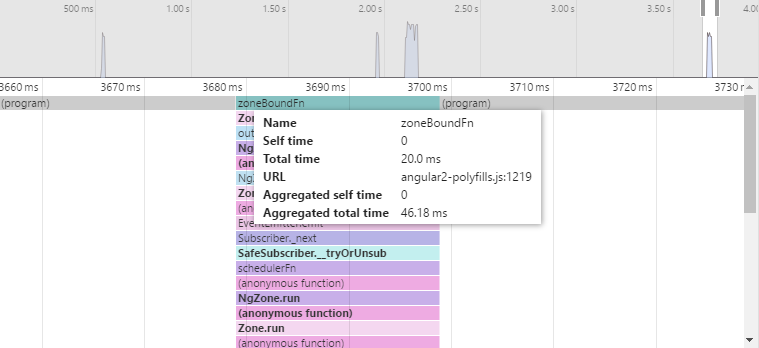
Here we’re using Observables and it’s already much quicker. We get 20 ms for this one function and an aggregated result of 46.18 ms. That’s about a 2.5-3x performance increase! Not bad if you ask me.

Conclusion

Of course, most of the time performance is not going to be that big of an issue, but if you have a complex app and you want it to also run on mobile, where cpu cycles are much more valuable, you might want to consider one of these approaches. You don’t even have to commit to one approach fully, but you can mix and match as you please. Check out Victor Savkin’s talk about change detection if you’d like to learn more. Another great resource, is this article by Pascal Precht, where he gives a complete breakdown about change detection in the more general sense. Hope you enjoyed reading this and would love to hear your thoughts!

Today we’re going to do a quick run-down on how to build Angular 2 applications using Functional Reactive Programming. As Angular 2 approaches its release, many developers have already had their hands on the various Alpha and Beta releases. Angular 2 is not an opinionanted framework and there’s dozens of articles, blog posts and tutorials about different kind of architectural styles, but one thing I felt was strange, was the lack of articles talking about Functional Reactive Programming in Angular 2.

Unlike Angular 1.x, Angular 2 has unidirectional data flow, which makes reasoning about it that much more easier. On top of that Angular 2 is built using RxJS and exposes RxJS Observables in the Forms and HTTP API.

Introducing Functional Reactive Programming

Functional Reactive Programming (FRP) is a paradigm for creating entire applications with nothing but streams of values over time. These streams can be anything from mouseclicks and button presses to lists of users and HTTP requests. Combining, modifying and subscribing to these event streams is basically all we ever do in this paradigm.

If you already know Functional Programming, FRP is going to be much easier to grasp. The same as in Functional Programming, we want to avoid any kind of mutable state and program by composing pure functions. Pure functions are functions that do not have any side effects, meaning the function always results in the same return value, when given the same arguments.

All of this will make our code much more concise, we can now program by telling the computer what you want to have, instead of how to get it. In that sense FRP is declarative, rather than imperative. We can now program at a higher abstraction level, similar to how coding in Angular 1.x featured a much higher abstraction level than coding with jQuery only. This reduces a lot of common errors and bugs, especially as your applications become more and more complex.

I’m not going to go into any more detail here, but if you’d like to know more, check out this introduction by Cycle.js creator André Staltz. Basically what FRP is about is this: Everything is a Stream, as André phrases it in his intro.

Everything is an Observable

In RxJS (and all the different implementations of ReactiveX) these streams we talked about are called Observables. In Angular 2, we can get Observables by sending HTTP requests, or using the Control API. Angular 2 also makes it easy to render these Observables, by subscribing to their value.

Again, I’m not going to go into more depth here, since it would be beyond the scope of this article, but if you want, you can check out this this video by Sergi Mansilla about FRP using RxJS (I can also really recommend his book!).

Without further ado, let’s start creating a small sample app, where we can calculate a BMI for a specific person. The first thing we’re going to want to do is creating a model.

export class Person {
    name: Observable<string> = Observable.create();
    bmi: Observable<number> = Observable.create();
    category: Observable<string> = Observable.create();
}

As we can see here, our model is fully comprised of Observables. I wasn’t kidding when saying Everything is an Observable.

Now it’s time to create our template:

<div>
    <h2>{{ person.name | async }}</h2>
    <form [ngFormModel]="form">
        <label>Name:</label>
        <input type="text" ngControl="name"><br/>
        
        <label>Height (cm):</label>
        <input type="number" ngControl="height"><br/>
        
        <label>Weight (kg):</label>
        <input type="number" ngControl="weight"><br/>
    </form>
    
    <div><strong> Body Mass Index (BMI) = {{ person.bmi | async }}</strong></div>
    <div><strong> Category: {{ person.category | async }} </strong></div>
</div>

Notice the async pipe? This is a really neat feature, that allows us to bind Observables to the template. So now we have a model, and a template to display and edit the data. The next thing we need is a component to put it all together.

@Component({
    selector: "person-bmi",
    templateUrl: 'templates/bmi-unit.html',
    changeDetection: ChangeDetectionStrategy.OnPush
})
export class BmiComponent {
    form: ControlGroup;
    nameControl: Control = new Control("");
    
    @Input('person') person: Person
    
    constructor(fb: FormBuilder) {
        this.form = fb.group({
            "name": this.nameControl,
            "height": new Control(""),
            "weight": new Control("")
        });
    }
    
    ngOnInit(){
        this.person.name = this.nameControl.valueChanges;
        
        this.person.bmi = this.form.valueChanges
        .debounceTime(200)
        .map(value => toBmi(value.weight, value.height))
        .filter(value => value > 0);
        
        this.person.category = this.person.bmi.map(bmi => toCategory(bmi));
    }
}

Now, I know this is a quite large snippet, but let’s walk through it. The first thing of note, is the change detection strategy. By setting it to OnPush we get a huge performance boost, because internally Angular doesn’t need to do deep equality checks on every browser event anymore. So we don’t just get more organized code, but we also make it faster. Check out this link for more on how Change detection works in Angular 2.

Secondly, notice how we put the initialization inside ngOnInit instead of the constructor. Since our Person is an marked as an Input field, we don’t have access to it inside the constructor, so we resort to ngOnInit.

The next thing to notice is that the valueChanges field on a Control or ControlGroup is actually an Observable. For our name field we don’t want to transform the data at all so we just assign it to the plain Observable. Angular 2 then subscribes to this Observable when you use the async pipe inside your template.

To calculate the bmi-Observable we’re doing something more complicated so let’s have a closer look:

this.form.valueChanges.debounceTime(200)

debounceTime emits an element from it’s source after any given time (200 ms in our case). This is very useful when we don’t want to react to every single key press. In this case it won’t change the BMI value if you just quickly delete a character and add it again directly after. It’s even more powerful when you use it for something like reacting to key presses with HTTP requests.

.map(value => toBmi(value.weight, value.height))

map is a very common operator in functional programming, it transforms every single emited value from the stream according to the passed function. In our case we transform our values for the height and width into a BMI value, by calling the toBmi function (omitted here).

.filter(value => value > 0);

Lastly we got filter which is another very common operator. It tells our Observable to only emit values when they fulfil the given predicate. We use it here to filter out any values that are 0 or NaN.

We then use the bmi to create the category Observable which maps a specific bmi to a category like “Normal”, “Underweight” or “Obese”.

Now when we run this with a Person instance we get a fully functioning application that calculates the BMI, written in pure FRP without any external mutable state. But wait a minute, this app hardly has any state at all. “This was way too easy. I want to see a real CRUD App”.

Alright, alright, let’s expand our example to create a list of the component we just created (I know I suck at thinking of example apps, sue me!).

First, let’s create a small template to display our list:

<section>
    <ul>
        <li *ngFor="#person of people | async">
            <person-bmi [person]="person"></person-bmi> 
        </li>
    </ul>
    <hr/>
    <button (click)="addNewPerson()">Add new Person</button>
</section>

Pretty easy so far, all of the syntax here should be quite easy to understand if you’re familiar with Angular 2. If you’re not, check out the cheat sheet.

Now, it’s time to write the component for this template.

export class PersonListComponent {
    
    people: Observable<Person[]>;
    
    addNewPerson: () => any;
    
    constructor() {
       
        const peopleSignal = Observable.create(observer => {
            this.addNewPerson = () => observer.next();
        });
        
        this.people =  peopleSignal.map(() => [new Person()])
        .startWith([new Person()])
        .scan((accumulator: Person[], value) => acc.concat(value));
        
    }
    
}

This is all the code needed for making a list, and see there, we’re not mutating any state. Hah! Told ya! Okay in all seriousness, let’s take a look at what we wrote here.

The people field is an Observable again, this time it’s an array though. We’ll take a look at that in more detail soon. Then we have the addNewPerson function, that get’s called whenever we press our button.

Now let’s take a look at peopleSignal. What we see here is how we create an Observable using Observable.create(). By binding our addNewPerson function to call observer.next() we ensure that, this Obvservable will emit a value everytime we click the button. This is far from pretty, sadly, but it’s currently the only way to create one from an event listener in Angular 2 (Let’s hope future versions offer something better!).

Then as a last step we transform our peopleSignal Observable into one that’s actually going to get things done. The first call to map tells our Observable to now emit an Array with exactly one new Person. The next step is a call to startWith. This sets the first value of people to be an Array with a single entry. Without startWith our Observable would be empty when we first start the app.

Now comes the cool part, scan is an operator that works very similar to reduce or fold. It processes the whole sequence and returns a single value, for example: sum and average are very often implemented using reduce. The main difference between scan and reduce is that scan will emit an intermediate value everytime the Observable emits one. reduce on the other hand only emits a value once the sequence ends. Our ability to click on our button won’t end anytime soon, so we definitely need the scan operator for this. The function we pass into scan will make sure, that every new value will be concatenated to our accumulator.

And with that we’re done. You can see the full app running here. We only used the forms API, but the HTTP Api also exposes Observables and can be used in almost the same way. This app is by no means production ready, but it’s enough to give you an idea, of what you can do with Angular and FRP.

Conclusion

Like React before it, Angular 2 doesn’t force you to use any specific architecture. However, like React before it, I feel it’s best to take a functional approach as much as we can. Using FRP we can coordinate between different components or server backends much more easily, since we don’t have to worry as much about managing our state. In the end, avoiding side effects as much as you can, can really save you time in building a complex reactive program.

Personally, I’m very content with the API the Angular developers have given us. It makes Angular 2 extremely flexible. If this post has you intrigued, I suggest you check out Cycle.js and/or Elm. Both are frameworks that take this kind of approach and expand upon it (although Elm is technically a full language). Unlike Angular and React these frameworks specifically want you to use this specific type of architecture. It’s highly interresting, how far you can take these approaches and I’ve enjoyed every minute of it.

If you’re already using some form of Reactive Programming with Flux and Redux, you should consider giving RxJS a try. I feel it’s much easier, and you can use that gained knowledge in any other language that provides the Rx Api (which is basically every common language out there). You can even find this quote in the Redux docs:

The question is: do you really need Redux if you already use Rx? Maybe not. It’s not hard to re-implement Redux in Rx. Some say it’s a two-liner using Rx .scan() method. It may very well be!

We’ve come a long way since Backbone, Knockout and the original AngularJS and the future looks even brighter! I hope you all enjoyed this piece and consider FRP in your future Angular 2 Project.

You can find all of the code shown here in this GitHub Repo.

Further reading:

Managing state in angular 2

FRP for Angular2 Developers - RxJs and Observables

Angular 2 Application Architecture - Building Redux-like apps using RxJs

Tony Hoare called them his billion dollar mistake, but we all know them, null references.

We can probably all agree that we’ve all had our fair share of annoyances with these infamous little things, so today we’re going to explore how different programming languages choose to handle (or not handle) null (or nil) values. This has been a topic for some time now and I always wanted to have some kind of comparison between different solutions, with their respective advantages and disadvantages.

First let’s look at an example how NOT to handle null in Java 7. You’ve probably seen something like this before and probably hoped never having to do it again.

The first solution I want to look at is the “Safe navigation operator” ?. in Groovy, which I believe was the first to implement it. With the Safe navigation operator we can chain the navigation without risking a NullPointerException. The above can be written in Groovy like this:

Last year in 2015, Ruby and C# added this feature as well. C# uses the same syntax as Groovy: Ruby went with &. to avoid confusion, since Ruby allows questions marks in their method names to signal a returned boolean value:

This is a great addition to the respective languages, however it does have one flaw. These null-checks are never enforced, so you can forget about them quite easily and introduce subtle bugs into your code base.

Other functional languages, such as Scala, F# and Haskell, take a different approach. They strive to completely eliminate the null value from their Type System.

Instead Scala and F# provide an Option type, while Haskell provides a very similar Maybe type. A value of type Option or Maybe can either hold a value of a given type or nothing.

This way you have to do an explicit check everytime you want to access a value that might not be there. It’s impossible for you to “forget”, because the type system enforces it.

Java adopted this kind of system in Java 8, which includes other functional programming features. We’ll see why that’s important later. First let’s look at an example in F#.

And here’s the same thing in Java 8:

map is a higher order function that transforms the value inside the Option if it exists and does nothing if it’s absent. flatmap does the same thing, however it flattens the result, so you don’t get nested Options like this: Optional<Optional<Optional<String>>> The same thing can also be applied in Scala:

However Scala also has a special syntax using for-comprehensions, which are much more readable if you ask me. Here’s how that would look:

This is a very good way to handle optional values and forching the user to handle null explicitly is a big step forward if you ask me. However one might argue that the Groovy, C# and Ruby solutions are much shorter and more concise. That’s why in the last few years languages have tried to combine the two concepts. We’re going to have a look at how Swift and Kotlin thrive to combine the two, for maximum readability.

First let’s look at an example in Swift:

So this is the exact same way Java, Scala and F# do it, but in Swift you can convert it to this:

So Swift invokes some syntactic sugar similar to Scala to improve readability. In the same sense you can write Optional<String> as String?.

Kotlin does this the same way:

So in these examples firm would either be a valid string, or null in kotlin and nil in Swift. In both languages, if you don’t explicitly make your variables optional by adding a ? after its type, it has to be initialized. This makes dealing with null values much more reasonable.

So that’s the rundown on the different strategies of dealing with null. I personally really like the syntactic sugar Kotlin, Swift and Scala provide and the absence of a real null in Scala, F# and other functional programming are even better. What do you guys think about this? What’s your favorite solution? Let me know!

References:

Groovy: http://www.groovy-lang.org/operators.html#_safe_navigation_operator

Kotlin: https://kotlinlang.org/docs/reference/null-safety.html

Java 8: http://www.oracle.com/technetwork/articles/java/java8-optional-2175753.html

Ruby 2.3: https://www.ruby-lang.org/en/news/2015/12/25/ruby-2-3-0-released/

Swift: https://developer.apple.com/library/ios/documentation/Swift/Conceptual/Swift_Programming_Language/OptionalChaining.html

C# 6: https://msdn.microsoft.com/en-us/library/dn986595.aspx

I recently came across a situtation where I tried to explain to a colleague the concept of Currying, partial function application and its benefits. I proceeded to show him a quick example in Swift and tried to refer him to the internet for more complex, but I wasn’t able to find a single example that goes beyond the basics.

So in this post, I’m going to try to explain why Currying is fun and how it’s done in Scala.

Firstly I’d like to specify what exactly Currying and partial application is, aswell as the difference between the two. Currying is the process of transforming a function that takes multiple arguments into a sequence of functions that each have only a single parameter. Partial application is different in that it takes an arguement, applies it partially and returns a new function without the passed parameter.

First the prime example for partial application that is found all around the net:

def add(a: Int)(b: Int) = a + b

val onePlusFive = add(1)(5) // 6

val addFour = add(4)_ // (Int => Int)

val twoPlusFour = addFour(2) // 6

assert(onePlusFive == twoPlusFour) // true

In this snippet we used partial application to create a function that adds 4 to an Int. We can do this, by seperating our arguments into different sets of parentheses and calling the function with only one parameter followed by an underscore _. With this multiple parameter lists, we’ve prepared our function for partial application and, as we’ll see later, already curried our function.

Now currying is a little bit more complex, but it explains how we get from a “normal” function to a curried function. A “normal” add-function is of the type (Int, Int) => Int. A curried add-function would be of type Int => (Int => Int).

Let’s take a look at how we can curry a function like this in Scala:

def curryBinaryOperator[A](operator: (A, A) => A): A => (A => A) = {
		
    def curry(a: A): A => A = {
        (b: A) => operator(a,b)
    }
	
    curry	
}

We’ve defined a generic function that will turn any binary operator into a curried function. We can test this out with an add or a multiplication function:

def add(a: Int, b: Int) = a + b // (Int, Int) => Int
def multiply(a: Int, b: Int) = a * b // (Int, Int) => Int
      
val addCurried = curryBinaryOperator(add) // Int => (Int => Int)
val multiplyCurried = curryBinaryOperator(multiply) // Int => (Int => Int)

Note here, that our addCurried function is the same as our add function above with the multiple parameter lists. So Scala makes it very very easy to create curried functions. Other functional programming languages like Haskell or F# also provide you with a very easy way to write curried functions.

Now all of this is pretty basic and is great to get a grasp of the Scala syntax. However it’s really not very useful in portraying the benefit of Currying or partial application. So I’ve prepared a scenario where it really comes in handy. Let’s imagine we wanted a program that deals with premiums for credit card usage. What we have is a list of credit cards and we’d like to calculate the premiums for all those cards that the credit card company has to pay out. The premiums themselves depend on the total number of credit cards, so that the company adjust them accordingly.

We already have a function that calculates the premium for a single credit card and takes into account the total cards the company has issued:

case class CreditCard(creditInfo: CreditCardInfo, issuer: Person, account: Account)

object CreditCard {
    def getPremium(totalCards: Int, creditCard: CreditCard): Double = { ... }
}

Now a reasonable approach to this problem would be to map each credit card to a premium and reduce it to a sum. Something like this:

val creditCards: List[CreditCard] = getCreditCards()
val allPremiums = creditCards.map(CreditCard.getPremium).sum //type mismatch; found : (Int, CreditCard)  Double required: CreditCard  ?

However the compiler isn’t going to like this, because CreditCard.getPremium requires two parameters. Partial application to the rescue! We can partially apply the total number of credit cards and use that function to map the credit cards to their premiums. All we need to do is curry the getPremium function by changing it to use multiple parameter lists and we’re good to go.

The result should look something like this:

object CreditCard {
    def getPremium(totalCards: Int)(creditCard: CreditCard): Double = { ... }
}

val creditCards: List[CreditCard] = getCreditCards()

val getPremiumWithTotal = CreditCard.getPremium(creditCards.length)_

val allPremiums = creditCards.map(getPremiumWithTotal).sum

So, yeah, that’s why Currying is awesome. It allows us to easily reuse more abstract functions. We can easily create more specialized functions by partially applying curried functions. This is especially important because we often need to pass very specific functions to higher order functions like map, filter or reduce. I hope I was able to shed some light on why Currying is cool and hope you can find use in your next project.